A moped blog
"Welcome to M.A.D, we hope you enjoy the blog and welcome any feedback. Please don't hesitate to contact us."
Monday, 30 January 2012
A moped western!
Looks like we're short one moped! No.... You brought two too many! Bang Bang........Bang!
Sunday, 29 January 2012
Tomos rear end gets an update!

So today i decided to change the rear end of the tomos heres a shot of it just after i'd removed the plate.

First of all i trimmed down the rear fender leaving just enough for the number plate mount.

Here's a shot with the numberplate mounted.
I mounted the LED tail light to the bottom of the seat and ran the wires through the seat post and in between the frame and the fender to the wiring harness.
I've just got to figure out the wiring, and i can take it for a test ride.
Saturday, 28 January 2012
The puch city lives!!!

Here it is installed in the cylinder. I used my new ring compressor which made it very easy.
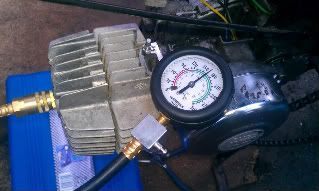
Once the cylinder was bolted back on with the new piston inside we checked the compression

Next we cleaned out the carb and installed that.
We then decided to put the old wheels back on as we had a few problems with the larger ones mounting correctly. Then we installed the Technigas exhaust.
And finally here it is running!!
Friday, 27 January 2012
The Tomos is getting a disk brake!!
Found this on the bay, a complete Honda sky front end. The forks are no good but the front wheels the right size. I've just got to figure out how I'm going to mount the caliper.....

Sinclairios parts have arrived!
A piston, gasket set, rear and front sprockets arrived and tomorrow we can get the puch city running!

Wednesday, 25 January 2012
In the words of Lloyd Grossman "who'd live in a house like this"?
Tuesday, 24 January 2012
The tomos is up and running!
So it turned out I had a loose connection on my stator and once I had been through all the connections I had a good strong spark. I also mounted up the voltage regulator and swapped out the rear bulbs for 12v ones. I just need to order a 12v headlamp bulb now.

Sunday, 22 January 2012
Parts ordered!
Well the parts are ordered, re-placement 45mm piston (as I split mine to buggerry), spare gaskets (always handy), three sprockets a 9 & 14 tooth for the front & 32 tooth for the rear tomos wheel once we get the engine running. Ordered from it from 50cc saving myself about $40's/€30's or 23 of the queens golden nuggets BOOOO...!
I'm not getting a spark!
Today I removed the small wire from the old lighting coil and attached it with a ring connector to the mounting bolt for the ignition coil. I then installed the new 12v lighting coil. I put the stator back on the bike and mounted the flywheel.
Now I'm not getting a spark?


Saturday, 21 January 2012
Clutch leather has arrived!
Looks a little thicker than I was expecting but nothing a little belt sanding won't solve.

12v lighting conversion
Here's the A35 stator with 12v lighting coil.
Here is the 12v lighting coil
All i need to do is swap the one on the left for the one on the right (A3 stator with 6v coils)
Unfortunately the 12v coil only has one yellow wire connected and the 6v coil has 2 a yellow and a green one.
Ok so here i have removed the old 6v coils and unravelled the green and yellow wires ready to install the new 12v coil and run its yellow wire up and out the top.
BUT!!!
The old coils are connected to the ignition coil with this little wire.
So i dont know what im suppose to do with this little wire??
I started a thread on Moped Army to find out:
http://www.mopedarmy.com/forums/read.php?7,2923715
Friday, 20 January 2012
Too many wires!
Apparently I can replace the A3s 6v lighting coil with the 12v lighting coil off the colibri. Instant 12v lighting! I'd better not forget the voltage regulator.


Thursday, 19 January 2012
A35 clutch drum is getting balanced.
I'm sending my a35s clutch drum off to Steve at NUBIKE of West Michigan. Hopefully once balanced it will run super smooth. While I'm waiting on that I'm going to weigh all the clutch segments and make sure they are all the same.

Tuesday, 17 January 2012
Sunday, 15 January 2012
I busted a ring grrrrrr!
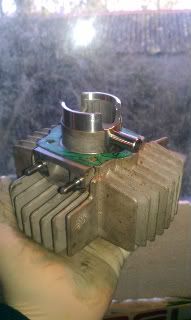
So today I decided I would take the top end of the a35 and use it to replace the busted airsal top end on Sinclairios e50. I was pretty sure it would fit as tomos and puch kits tend to be interchangeable. Also I meant that the e50 would now have a reed valve instead of a piston port. I had some Polini carbon reeds to go on it too. Anyway long story short, I bust a ring trying to install the piston. Ordered new rings and the smallest ring compressor I could find. Here's a couple of shots I took:


Friday, 13 January 2012
A quick test ride!
I got out for a little ride this evening. Second gear is definitely shifting later, but it still not a clean shift. Got 47mph out of her. But I think with a different pipe that has a higher power band I could be pushing 60.
When I pulled up at home I noticed the intake had been frosted. Hmmm airleak??

Wednesday, 11 January 2012
Uprated clutch springs installed!
I installed the new clutch springs today while I was reassembling the a3 clutches. I decided to put a light spring on first gear and a heavy spring on the second gear clutch. I hope to get the second gear to engage as late as possible. I also cut some groves into the 2nd gear clutch pad.

I've fixed the Tomos! Part 2
As the a35 pivot pins didn't fit in the a3 clutch and a3 pivot pins are no longer available I had no choice but to fabricate my own. Sinclairio suggested I make some out of a suitable sized bolt. It worked and the clutch is engaging as it should.


I've fixed the Tomos!
I compared the clutchs from the a3 and a35 today and found unfortunately the pivot pins are not interchangeable. Here is a shot of the a35 pins.

Tuesday, 10 January 2012
My new A35!
Nothing broken in here! I'll need to split the crank case next.
So here are the A35 clutches. I'll take those three pins out to go in the A3 clutch so i can at least get back on the road. I'm thinking of putting the new light clutch springs on the A3 and i will save the heavy springs for the A35 build.
Sunday, 8 January 2012
So we now have a massive box of spares if anyone needs anything let us know.
Here are the wheels, they just need a little cleaning up. Check out that rear tire its a 2.75!!
Heres the Puch before...
....and after. SWEET!!
It was missing something so we dug out the drop bars
and its looking good.
Saturday, 7 January 2012
Whats next?
Also the Wheels are coming off and going on the Puch City
Stand by for pictures
Friday, 6 January 2012
Uprated clutch springs have arrived
The new uprated clutch springs I ordered for my tomos came through th door today!

Wednesday, 4 January 2012
Still trying to get the new tomos running!


